Wednesday, January 21, 2015
Keel Work
Today ended with a successful attempt at scarfing two piece of mahogany together for the keel. More on that in a few minutes.
Since the last update, Ive been working the few remaining items I can work on before having to spend additional money. As mentioned in that post, I am in savings mode to buy additional lumber at the end of October. So I am only doing tasks that use items and materials on hand.
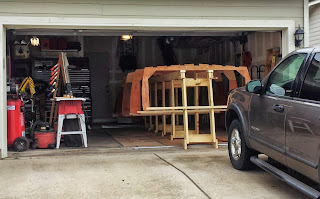
Before I get into that, I wanted to show a picture of the boat as seen from outside my garage. I like this picture primarily because you get a good sense of scale. For me, this is pretty exciting as I can easily visualize the final product.
One of the first items to install on the frames after mounting them to the form is the keel. The keel is comprised of two 1" by 4" pieces of mahogany that are mounted at the very bottom of the boat and run from the transom all the way up to the stem. These pieces are laminated together and the combination is stronger than a single thicker piece of mahogany, Essentially this is the backbone of the structure.
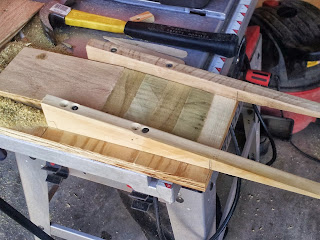
In order to mount these to the frames, each frame must have notches cut into them.Whats important about these notches is that they must not be too deep. What will eventually happen when the skin is to be applied is that any excess material must be faired away. The frames are angled on the bottom surface and come to a point at the apex. You do not want any gaps here after the keel is laid in and later excess is faired away. So the keel must be laid in so that there is still keel material at the apex. This is somewhat hard to visualize but the next picture shows how it should look after the notch is cut to the correct depth.

Notice how the keel does not go below the edge of the notch on the sides. Instead it protrudes up a bit. When the keel is later faired to match the frame profile, there will be material all the way up to the apex of the frame. Each frames notch depth is different, but the end result should be that the keel follows a straight path across the frames. In reality some of the forward frames are somewhat lower so the keel will have a slight curve near the bow. My suggestion to other builders is that careful attention be paid to this area before accomplishing the work because other boats will be different.
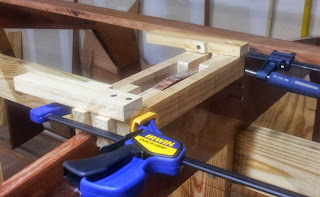
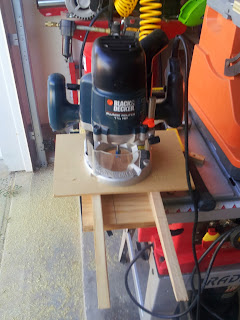
I could have cut these notches using a variety of methods to remove the material. I chose to use a router which required a router jig. This next picture shows what I came up with. It is essentially two pieces of wood that clamp on opposite sides of the frame. It has stops to control the amount of cut to each side. Depth is controlled by gradually adjusting the router down, taking into consideration the previous discussion about notch depth and continually checking before cutting away more material. The jig must be centered on the area to be removed and must be lined up with the same notches on the other frames. Remember, ultimately the keel will be laid in these notches and must follow a straight path to the bow..
The keel, as mentioned earlier, is two 1" by 4" pieces of lumber. It needs to extend from the transom frame to approximately 9" into the stem. This distance is nearly 17 feet. The longest piece of mahogany I had is 16 feet long. In order to get the extra length, I need to glue two pieces together. This is done with what is called a scarf joint. Essentially, the two opposite ends are cut at complimentary angles and then glued together. If done properly, this joint is very strong.
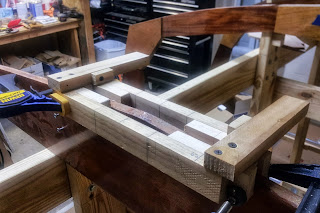
This next picture, of a couple of scrap pieces of plywood, shows the type of joint I am talking about. This particular photo was taken during the process of developing the scarfing jig and the pieces dont fit exactly as they should. When I got to the point of performing the scarfing cut on the keel, I had the process worked out so that the joint was correct.

Since the last update, Ive been working the few remaining items I can work on before having to spend additional money. As mentioned in that post, I am in savings mode to buy additional lumber at the end of October. So I am only doing tasks that use items and materials on hand.
Before I get into that, I wanted to show a picture of the boat as seen from outside my garage. I like this picture primarily because you get a good sense of scale. For me, this is pretty exciting as I can easily visualize the final product.
One of the first items to install on the frames after mounting them to the form is the keel. The keel is comprised of two 1" by 4" pieces of mahogany that are mounted at the very bottom of the boat and run from the transom all the way up to the stem. These pieces are laminated together and the combination is stronger than a single thicker piece of mahogany, Essentially this is the backbone of the structure.
In order to mount these to the frames, each frame must have notches cut into them.Whats important about these notches is that they must not be too deep. What will eventually happen when the skin is to be applied is that any excess material must be faired away. The frames are angled on the bottom surface and come to a point at the apex. You do not want any gaps here after the keel is laid in and later excess is faired away. So the keel must be laid in so that there is still keel material at the apex. This is somewhat hard to visualize but the next picture shows how it should look after the notch is cut to the correct depth.
Notice how the keel does not go below the edge of the notch on the sides. Instead it protrudes up a bit. When the keel is later faired to match the frame profile, there will be material all the way up to the apex of the frame. Each frames notch depth is different, but the end result should be that the keel follows a straight path across the frames. In reality some of the forward frames are somewhat lower so the keel will have a slight curve near the bow. My suggestion to other builders is that careful attention be paid to this area before accomplishing the work because other boats will be different.
I could have cut these notches using a variety of methods to remove the material. I chose to use a router which required a router jig. This next picture shows what I came up with. It is essentially two pieces of wood that clamp on opposite sides of the frame. It has stops to control the amount of cut to each side. Depth is controlled by gradually adjusting the router down, taking into consideration the previous discussion about notch depth and continually checking before cutting away more material. The jig must be centered on the area to be removed and must be lined up with the same notches on the other frames. Remember, ultimately the keel will be laid in these notches and must follow a straight path to the bow..
The keel, as mentioned earlier, is two 1" by 4" pieces of lumber. It needs to extend from the transom frame to approximately 9" into the stem. This distance is nearly 17 feet. The longest piece of mahogany I had is 16 feet long. In order to get the extra length, I need to glue two pieces together. This is done with what is called a scarf joint. Essentially, the two opposite ends are cut at complimentary angles and then glued together. If done properly, this joint is very strong.
This next picture, of a couple of scrap pieces of plywood, shows the type of joint I am talking about. This particular photo was taken during the process of developing the scarfing jig and the pieces dont fit exactly as they should. When I got to the point of performing the scarfing cut on the keel, I had the process worked out so that the joint was correct.
The scarfing jig is simply two angled pieces of lumber attached to a board. The distance between the angled parts is the same as the width of the part to be scarfed. The angle has to be a certain amount determined by a ratio that is applied to the thickness of the material being cut. The recommended ratio for 3/4" to 1" boards is 1:8. Other thicknesses have different ratios. You simply multiple the second number times the thickness to get the length of the angled surface (hypotenuse of the future triangle shaped piece of wood). Using some math and some help from the Internet, I calculated the skinny angle to be a bit over 7 degrees.
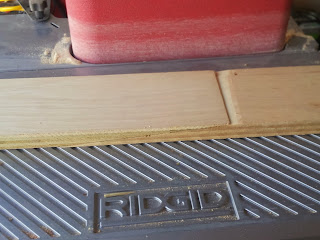
The next picture shows the jig after the angles are attached to the board. They extend off the board because the end of the board is where the end of the scarf cut is made and the angle must be higher than the thickness of the material being cut.
The router is set on these angles and its depth is set to cut so that the edge of the material at the end of the jig is very thin (essentially matching the angles). You can see the scrap plywood in the previous photo after it has been cut. The important thing to remember here is that you should do this in several passes rather than trying to cut everything all in one pass.
Not seen in the previous photo is a mistake I made subsequently to this last picture. The excess angles were cut off the scarfing jig. This was a mistake because it made it more difficult to keep the router level when cutting near the edge of the jig. Youll also notice I had to make a wider base plate for the router so that it could still be supported when cutting near the edges of the boards.
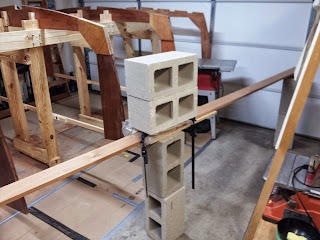
After completing the scarf cuts on both halves of the keel, it was time to glue them together. It is important here to insure that the two parts are straight with each other. The scarf joints must be fully seated or you will end up with the two boards offset in height from each other. After applying the epoxy, the boards will tend to want to slide away from each other. I found out about this the first time I tried to glue up the keel halves. The resulting joint was offset and worse, it wasnt even pressed completely together. The following picture shows the failed method I used on the first attempt.
The two cinder blocks on top were insufficient to press the two pieces together firmly enough. I also had too much epoxy applied which further held the two parts of the joint apart. And I couldnt see that the parts had slipped.
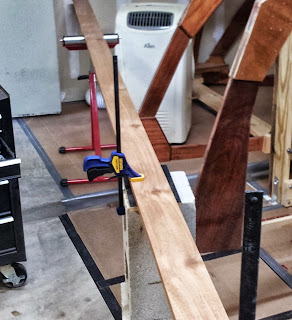
Fortunately, my two keel halves are long enough that I could cut out the bad joint, create new scarfs, and re-glue a second time. For the second attempt I clamped the two keel halves to their supporting cinder locks to prevent them from moving. I also used clamps and a scrap piece of wood to put enough pressure on the joint. And I made sure that I didnt put as much thickened epoxy on the joint. Note, it is important to get sufficient epoxy in this joint and you do not want excessive pressure on the joint.
By carefully and slowly applying pressure to each clamp, I was able to get the parts glued together without the two haves sliding apart and keeping the two halves straight in relationship to each other. There was still a tendency for the two pieces to slide apart even though they were clamped . This is because the cinder blocks I was resting them on would rock slightly. I had to compensate for this and be careful when clamping the joint together.
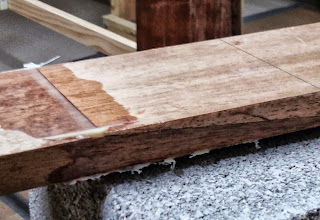
The final result, after the epoxy cured is shown in the next picture. I havent cleaned up the glue yet, but the parts are scarfed together correctly and the height of each half is correct in relation to the other (no offset). The boards are straight and lined up side to side as well.
I now have a keel piece that is approximately 21 feet long. When I get the remaining lumber next month, I will make the second keel piece. It is important to install the keels so that the the scarf joints for the two keel pieces are separated by at least six feet. That is why I made the keel longer than the 17 feet I actually need. This way I can slide it fore and aft to keep the two scarf joints away from each other. Ill cover that more fully in the future.
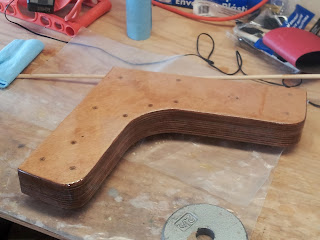
The only other work Ive accomplished is to complete work on the knee. It is assembled and fully encapsulated. This part will eventually join the keel to the transom frame. This will be covered in a future posting as well.
As always, these pictures and others are available for viewing in my construction gallery available through the link at the upper right corner of the blog page.There are multiple folders of pictures organized into main tasks so that you can see like work grouped together.
My usual practice is to put all the newest pictures in the folder called latest photos until I create the next blog article.At that point some of those pictures are used in the blog and all of the pictures are moved into the appropriate task folder in the gallery.
So that is it for now. There wont be much more for awhile until I get the lumber. I dont have the hardware yet to attach the keel or the stem and wont be doing those tasks until after I get the lumber. About the only remaining task is to cut a notch into the stem to accept the keep pieces. So I ask patience while I save the necessary funds to get more material. Take care.
Subscribe to:
Post Comments (Atom)
0 comments:
Post a Comment